Working a Case - GitHub
- Clone repo – For Github, you will find the link to use after clicking on the green “Clone or download” button. Example:
git clone git@github.com:Banno/microsites.git
- Run npm install inside the development folder of that repo.
npm install
- Checkout branch with case number with command:
git checkout -b case123456
Complete the requested changes on your newly created branch.
Gulp or Grunt to rebuild the deploy.
Upload zip to UAT via the CMS to check your work. You want to make sure you see all the edits requested and that any new editable areas you created can be edited and saved. Be sure to check your console for errors. Also use the DQM page check tool to make sure you did not introduce any new ADA issues after your edits. Keep in mind, if someone is also working another case for the same client at the same time, their work will override yours on UAT. That is totally fine. Client will be taught to expect that for two changes that are “shipping” (going live) at different times.
You can wait until you are done with your changes or you can keep pushing your work up to the repo (on your branch) as often as you like while you work. This is just in case something happens to your computer. You wouldn’t want your work to be lost. To do this you would run the Add, commit, and push branch commands like this:
git add -A
git commit -m "message about what you did"
git push origin case123456
Create a Pull Request. If you just pushed up your change, you should have a green prompt button (Compare & pull request) for this highlighted with a yellow bar on git. DO NOT merge your branch into master yet. You are just creating the pull request to make it easier when it is time to publish.
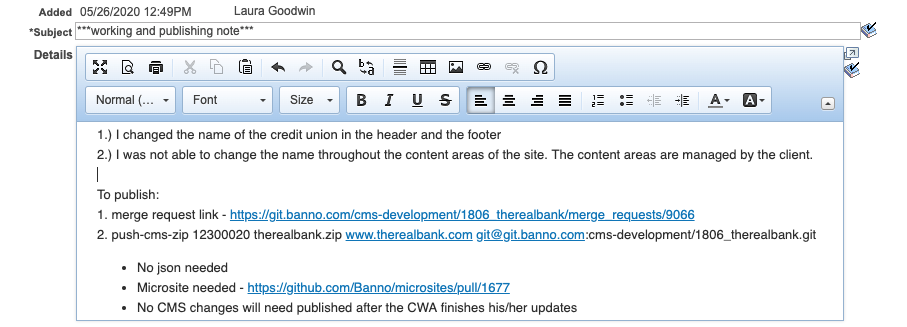
Send case to CWA for client to review work on UAT. This is an example of how the case note should look. Subject line should have asterisks on it so it is easy for anyone to find among the list of notes. You should summarize what you did including anything you were not able to do and why. You also need to make sure the publishing info is stated as shown so someone else will know exactly what needs to be published. For any JSON edits, you may attach a txt file with the commands to run for Keanu. Be sure to include a description of what you changed along with it. See reason below in the “Potentianl issues” section.
Take your detailed case note from step #9 and put it as a comment on your pull request. This will help others with tracking changes/issues/publishing in your absence.
Log time on your case tracking spreadsheet or personal notes if you wish.
If you have to do more work for the case, since you have not merged or published this branch, you can still use the same branch to do your work and add, commit, and push up to your branch as needed (repeating steps #4-7). Your pull request will track all the activity for you. Be sure to log any “rounds” of work you do on your case tracking spreadsheet or use the Case Tracking Form.
If the case comes back to you for publish, and you can 100% tell that there has been no other work done and merged to master since you created your branch (usually indicated by a green button that says “Merge pull request”), you can just do the following:
Add a comment to the pull request that says “Approved and Publishing Live”.
Automatically merge via the green button that git provides. You will have to confirm it. You might be prompted to do it manually. If you have to do it manually and it is not because of merge conflicts, just follow the instructions git provides to you on that screen. However, if it is prompting you to do it manually because of merge conflicts, use the steps below starting with step #14.
Delete your branch right after you merge it. This looks a little bit different than it did on GitLab. It is done right after the merge with a grey button that says, “Delete branch”.
Run your Keanu publish command – It should look like this:
push-cms-zip 12231430 totaldirectbank.zip www.totaldirectbank.com git@github.com:Banno/totalbank_2192.gitCheck live site for your changes and ensure there were no other issues created. Again, it is a good idea to check for any console errors.
Delete your branch from git if you didn’t already do so. If you didn’t do it at the same time as you merged, you will have to navigate to branches. You can delete it from there.
Send case back to CWA.
Log time on your case tracking spreadsheet or use the Case Tracking Form.
Skip to step #15.
If the case comes back to you for publish, and there HAS been other work done and merged since you created your branch (usually indicated by the “Merge Pull Request” being grayed out along with a notice that there are merge conflicts), you’ll need to deal with the merge conflicts.
Now we are done. But just a note or two about working further cases or having to rework an older case after it was published:
If you get a new case for the same client, as always, be sure you first go back to master (git checkout master) and do a git pull (git pull) so it is up to date on your machine, THEN checkout a NEW branch for THIS new case.
If you are asked to do more work on this same case AFTER you’ve done the above steps and published, treat it like a new case (step #16). This time name the branch something like “case123456B” or case123456-V2”.
Potential issue with working multiple cases regarding json template changes.
You would want to pull the current state of the live templates json right before you publish your change. Someone else might have changed the same template after you last looked at it for your case. You do not want to remove anything they may have added inadvertently.
Then use THAT current state, with your changes applied to it and update via keanu or ask tech-ops assistance.
For case notes, just explain what template you changed and how along with attaching a txt file. This way anyone else would know what to change in your absence.