As of: October 1, 2020
1. CREATING A CASE
You will need to create a case on behalf of a client if they have been communicating with you through email or phone and they need a work request completed or issue resolved
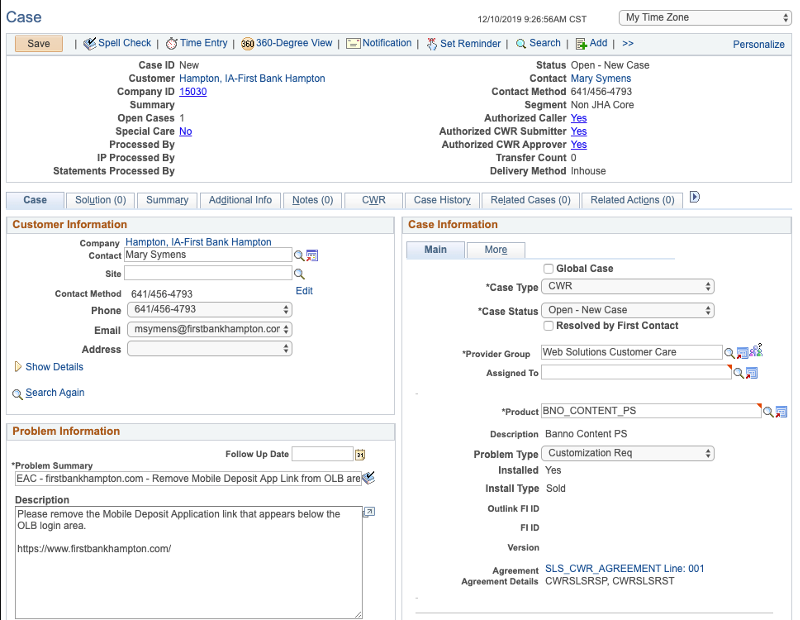
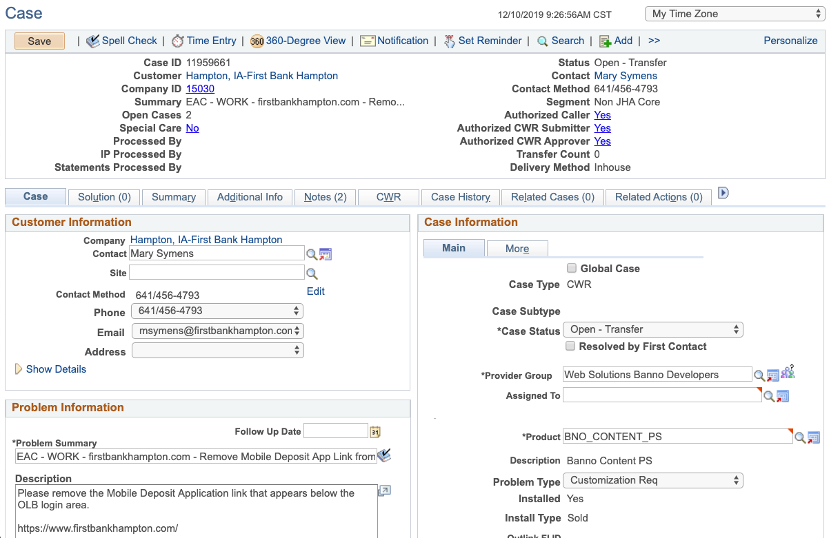
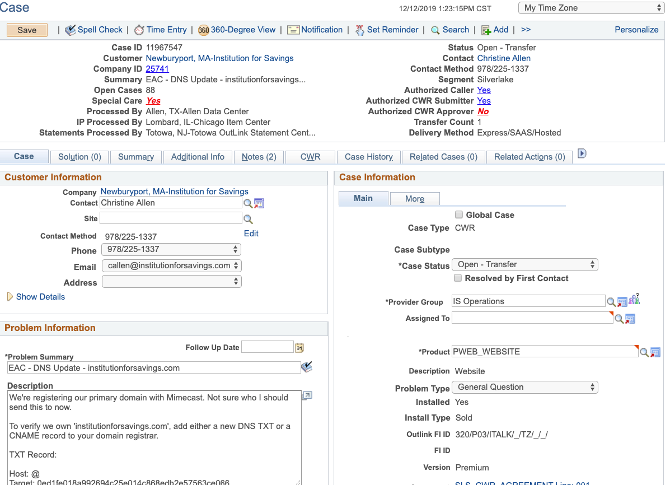
- A. Open jSource CRM
- B. Click Add Case
- C. Enter Client Name (First and Last) and click Search
- i. This should pull up the correct person automatically unless it’s a common name or this person is not in the CRM system
- a. If it is one of these instances, it will pull up a search results page
- i. Select the correct person listed in the results list
- b. If it is one of these instances, it will pull up a search results page
- a. If it is one of these instances, it will pull up a search results page
- ii. Verify is the correct person & FI at the top of the screen
- i. This should pull up the correct person automatically unless it’s a common name or this person is not in the CRM system
- D. Move down to the Problem Summary Tab
- i. Add your initials first
- ii. Add FI domain (for Banno) or FI folder name/number (for PWEB)
- iii. Add brief description of case
- E. Move down to the Description field
- i. Add details of work request or issue
- F. Move to the Product field
- i. Select appropriate product for client
- a. Banno Content
- b. Pweb_Website
- i. Select appropriate product for client
- G. Choose a Problem Type
- i. Generally, you will choose ‘customization request’ for a CWR
- ii. Other cases can be listed as General Question or Issue
- H. Move to the Provider Group field
- i. Select appropriate Web Solutions Support Group
- a. Most clients are in the main ‘Web Solutions Customer Care’ support group
- b. Clients with 160 (or other monthly amounts, other than ‘current rate’ listed in FI Status) will be ‘Web Solutions Customer Care 160’
- i. Select appropriate Web Solutions Support Group
- I. Move to the Case Type field.
- i. Change to CWR if this is a work request
- ii. Example:
- J. Hit Save at the TOP of the page.
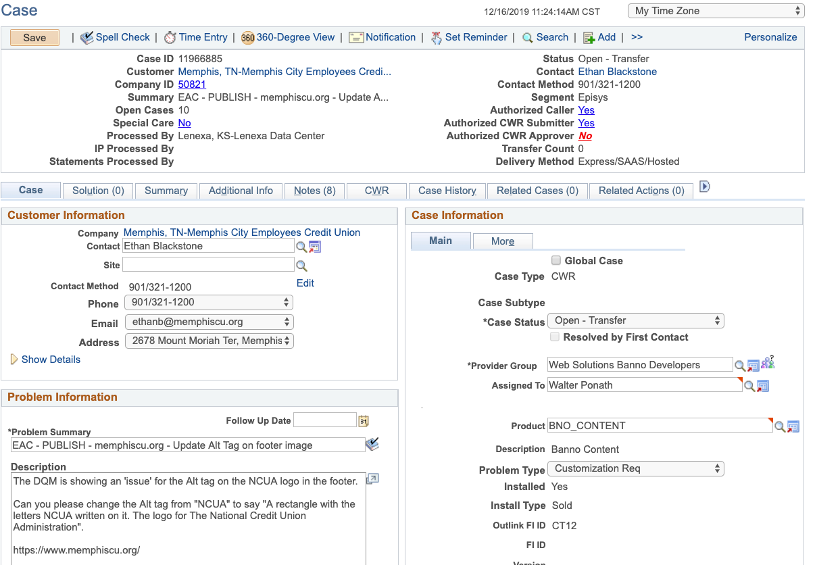
- K. Move to the Case Status field
- i. Change the status to ‘Research’ or ‘Review Notes’
- L. Move to the Assigned To field
- i. Put your name in the filed
- M. Hit Save at the TOP of the page
- N. Hit Save at the TOP of the page
- i. Go to Notes tab
- ii. If this is the first note, the fields will be available for you to type the note in. If not, click Add Note
- a. Add note details
- b. Choose ‘Comment’ as Note Type
- c. Click Apply and Save at the Top
- O. Add yourself as an interested party for the case
- i. Click on Interested Party Tab
- ii. Add your first and last name in the tab
- a. Click Enter or hit the magnifying glass
- i. Select your name from the list
- a. Click Enter or hit the magnifying glass
- iii. Choose Interested Party from the drop down list
- P. Hit Save at the TOP of the page
2. RECEIVING A CASE FROM CLIENT/CALL CENTER
- A. Open jSource CRM
- B. Click Search Case
- C. Paste the case number into the case field and hit enter/search
- i. This will bring up the case.
- D. Move to Assigned To field
- i. Put your name
- E. Move to Status field
- i. Change to research or review notes
- F. Move to Problem Summary field
- i. Add your initials to the beginning
- G. Hit Save at the TOP of the page.
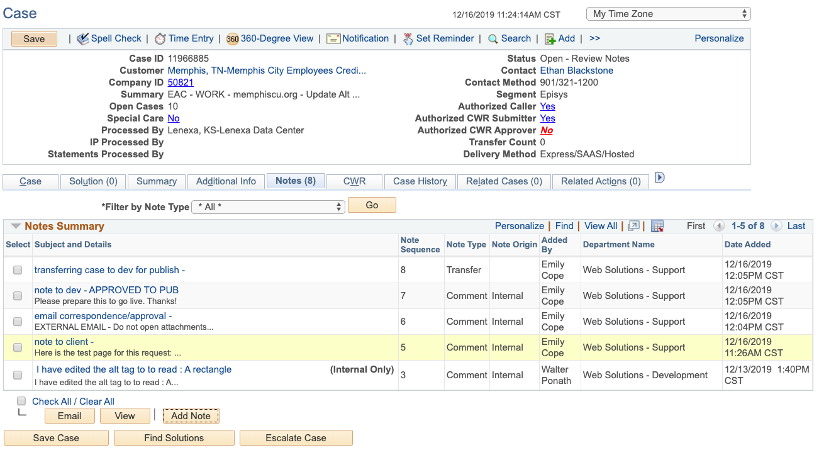
- H. Work the case – Add a note to the client/Contact the Client
- i. Click on the notes tab
- a. Add a note to the client (or if you spoke to the client on the phone, type a brief summary of your phone conversation in the note field)
- b. Always leave the notes ‘Visibility’ as All unless it is private information for internal eyes only.
- c. Generally, the note type will always be ‘comment’ unless you are transferring the case.
- i. Click on the notes tab
3. SENDING A CASE TO BANNO DEV
- A. Make sure the case is already saved as a CWR
- i. See section 1 on how to create a case
- B. If needing a quote:
- i. Add a note to dev with all the info necessary for the developer to quote the request
- a. Be sure to add the domain of the website that is being worked on.
- b. If you do not understand the full concept/request from the client, do not expect the developer will.
- i. Ask questions from the client before you send it on!
- ii. Hit Save at the TOP of the page.
- iii. Leave the CWR date on the CWR tab blank
- iv. Add QUOTE next to your initials in the Problem Summary field on the Case tab.
- v. Make sure you are listed as an interested party on the Interested Party tab.
- vi. Add a transfer note to dev on the Notes tab.
- a. Note type should be transfer
- vii. On the Case tab, change the Status to Open-Transfer
- viii. Change provider group to Web Solutions Banno Developers
- a. Leave it unassigned
- ix. Hit Save at the TOP of the page.
- i. Add a note to dev with all the info necessary for the developer to quote the request
- C. If needing work to be completed:
- i. Add a note to dev with all the info necessary for the developer to complete the request
- a. Be sure to add the domain of the website that is being worked on.
- b. If you do not understand the full concept/request from the client, do not expect the developer will.
- i. Ask questions from the client before you send it on!
- c. If there have been several notes between the time the case was quoted, or if it has been to design previously, be sure to add a recap note as the most recent note to dev
- ii. Hit Save at the TOP of the page.
- iii. In the CWR tab, add a Due Date
- a. Due date will typically be 5 business days, but keep in mind if the team is told that the dev queue is running behind or if there are holidays, you might need to add an extra day or two.
- i. Be sure to always communicate with the client that the typical turn around time is 5-7 business days.
- a. Due date will typically be 5 business days, but keep in mind if the team is told that the dev queue is running behind or if there are holidays, you might need to add an extra day or two.
- iv. Add WORK after your initials in the Problem Summary on the Case tab.
- a. If the work request is simple (no more than a 2 hour quote and doesn’t require new elements being created) you can put the status as L1 WORK
- b. If the work request is needing to be completed ASAP (same business day/within 1 business day) put the status as ASAP WORK
- i. Mention the request to the support devs in the org-website-updates slack room to make sure immediate eyes are on it
- ii. Make sure the client has approved the ASAP Fee
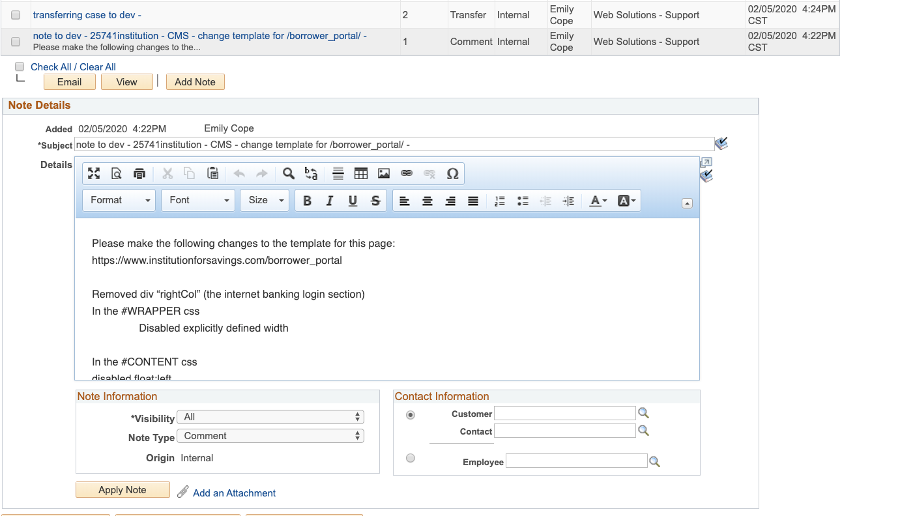
- v. On the Notes tab, add a transfer note to the developers
- a. Note type should be Transfer
- vi. Change Status to Open-Transfer on the Case tab.
- vii. Change provider group to Web Solutions Banno Developer
- a. Leave unassigned
- viii. Hit Save at the TOP of the page
- ix. Example:
- i. Add a note to dev with all the info necessary for the developer to complete the request
- D. If Rework/Follow-up is needed:
If there is a fix or correction of the original request needed (aka not new work!)- i. Add REWORK to the problem summary next to your initials on the Case tab if this is an item the developer missed originally.
- a. If this is just follow-up work/updates to original case, leave WORK in the problem summary
- ii. Add note to the developer explaining the changes/fixes needed
- iii. Hit Save at the TOP of the page
- iv. Add transfer note to the developer
- a. Note type should be Transfer
- v. Change status to Open-Transfer on the Case tab
- vi. Change provider group to Web Solutions Banno Developers
- vii. Assign it to the developer who did the initial request
- viii. Hit Save at the TOP of the page
- i. Add REWORK to the problem summary next to your initials on the Case tab if this is an item the developer missed originally.
- E. Case is ready for Publish!
- i. Add note letting the developer know that this request is ready for publish
- a. If this needs to be published at a specific day/time, please indicate this in the case note
- i. If this scheduled publish is after-hours, get the clients approval for the after-hours fee first and then check with the developer to see if they will be available to publish it at that time or if there needs to be another developer assigned.
- ii. If this is going to a different developer to publish live, copy the Pub Notes from the developers note into your new note, so they are easily accessible.
- b. Example:
- a. If this needs to be published at a specific day/time, please indicate this in the case note
- ii. Add PUBLISH to the problem summary next to your initials on the Case tab
- iii. Hit Save at the TOP of the page.
- iv. Add transfer note to the developer on the Notes tab
- v. Change status to Open-Transfer on the Case tab
- vi. Change provider group to Web Solutions Banno Developers
- vii. Assign to the developer who did the request (or who will be doing the publish)
- viii. Hit Save at the TOP of the page
- ix. Example:
- i. Add note letting the developer know that this request is ready for publish
4. SENDING A CASE TO BANNO DESIGN
- A. Make sure the case is saved as a CWR first.
- i. See section 1 on how to create a case
- B. If needing a quote:
- i. Put Quote next to your initials in the Problem Summary
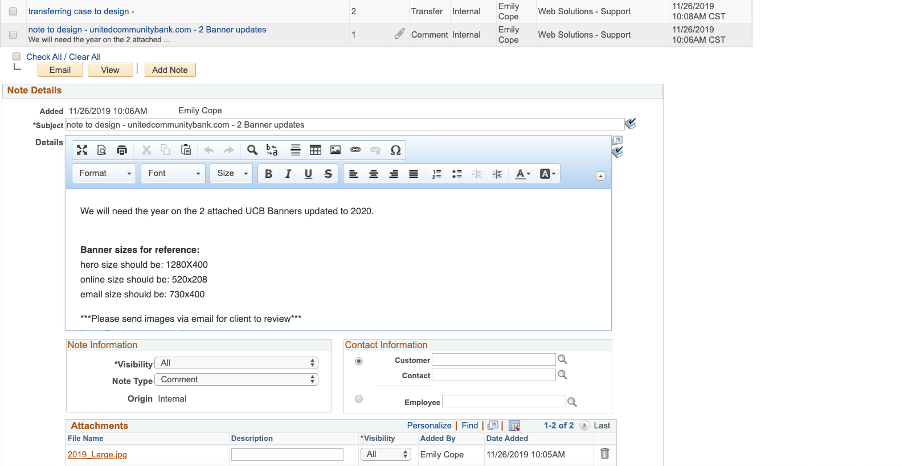
- ii. Put a note to design writing out entire request
- a. If you do not understand the full concept/request from the client, do not expect the designer will.
- i. Ask questions from the client before you send it on!
- a. If you do not understand the full concept/request from the client, do not expect the designer will.
- iii. Hit Save at the TOP of the page
- iv. Put transfer note to design
- a. Note type should be Transfer
- v. Leave CWR date blank
- vi. Add yourself as an interested party on the Interested Party tab
- vii. Change status to Open- Transfer on the Case tab
- viii. Change provider group to Web Solutions Banno Designers
- ix. Leave case unassigned
- x. Hit Save at the TOP of the page
- C. If needing design work completed:
- i. Put WORK next to your initials in the Problem Summary field on the Case tab.
- ii. Add note to design with all details
- a. If you do not understand the full concept/request from the client, do not expect the designer will.
- i. Ask questions from the client before you send it on!
- b. Be sure to put a recap note at the top if this case has already been put in the queue previously for a quote.
- a. If you do not understand the full concept/request from the client, do not expect the designer will.
- iii. Hit Save at the TOP of the page
- iv. Add transfer note to design
- a. Note type should be Transfer
- b. Example:
- v. Change CWR due date to 5 business days out
- a. Communicate with the client the turn around time is 5-7 business days.
- vi. Add yourself as an interested party (if you haven’t already)
- vii. Change status to Open-Transfer on the Case tab
- viii. Change provider group to Web Solutions Banno Designers
- ix. Leave case unassigned
- x. Hit Save at the TOP of the page
5. SENDING A CASE TO BANNO OPS
- A. For SSL Renewals/Orders
- i. Reference the All Things SSL doc here.
- B. For all other OPS Requests (ex: redirects, new DNS setup)
- i. Create CWR Case like normal
- a. See section 1 on how to create a case
- ii. Add Note to OPS in the Notes Tab
- a. Add Request information
- b. List the domain this request is for
- c. Note Type should be Comment
- iii. Add Due Date on CWR Tab
- a. In the Requested Completion Date field
- iv. Add yourself as an interested party on the Interested Party Tab
- v. Hit Save at the top of the page
- vi. Add Transfer note in Notes Tab
- a. Note type should be Transfer
- vii. Change status to Open-Transfer on the Case tab
- viii. Change provider group to Banno Tech OPS
- a. Leave unassigned
- ix. Hit Save at the top of the page
- i. Create CWR Case like normal
6. SENDING A CASE TO PWEB DEV
- A. Make sure the case is already saved as a CWR
- i. See section 1 on how to create a case
- B. Problem Summary field
- i. Add your initials
- ii. Add the folder name/number
- iii. If this is a Quote, add QUOTE to the Problem Summary Field after initials
- iv. If this is a work request, add WORK to the Problem Summary Field after initials
- C. Problem Type
- i. General Question
- D. Product
- i. Pweb_Website
- E. Provider Group
- i. Web Solutions Customer Care or Web Solutions Customer Care 160
- F. Add a note to Dev on Notes tab
- i. Add a note to dev with all the info necessary for the developer. If this is needing to be quoted first just add QUOTE in teh Note Summary.
- a. Be sure to add site details
- i. RedDot/DW/EPI
- ii. Folder Number/Name
- iii. Server
- iv. Banno Monitor (Catbird) Yes/No
- v. CMS Project Number/Name (if applicable)
- b. If you do not understand the full concept/request from the client, do not expect/assume the developer will
- i. Ask questions from the client before you send it on!
- a. Be sure to add site details
- i. Add a note to dev with all the info necessary for the developer. If this is needing to be quoted first just add QUOTE in teh Note Summary.
- G. Add Due Date in CWR Tab
- i. Requested Completed Date
- H. Add yourself as an Interested PartyThi
- i. On the Interested Party tab
- I. Hit Save at the top of the page
- J. Add Transfer Note in the Notes Tab
- i. Note type must be Transfer
- ii. Example:
- K. Change Provider Group to Web Solutions Customer Care Developers
- i. Assign to Walter Ponath
- a. If Walter is on PTO, go to the jSource room in Slack to see who can grab the case.
- i. Assign to Walter Ponath
- L. Change Case Type to Open-Transfer
- M. Hit Save at the top of the page
- N. Publishing case
- i. When the case is approved by the client add a ‘publish note’ to the case and transfer it back to the developer.
- a. If this is a scheduled publish for after-hours, get the clients approval for the after-hours fee first and then check with the developer to see if they will be available to publish it at that time or if there needs to be another developer assigned.
- ii. Add PUBLISH to the problem summary next to your initials on the Case tab
- iii. Hit Save at the top of the page
- iv. Add a transfer note to the developer on the Notes tab
- a. Note type should be Transfer
- v. Change status to Open-Transfer on the Case tab
- vi. Change the provider group to Web Solutions Customer Care Developers
- vii. Assign to the developer who did the request (should only be Walter Ponath)
- viii. Hit Save at the TOP of the page
- i. When the case is approved by the client add a ‘publish note’ to the case and transfer it back to the developer.
7. SENDING A PUBLISHING CASE TO PWEB DEV
- A. This is only for instances where the developer did not do the work request, but files are needing to be published live.
- B. Create CWR case
- i. See section 1 on how to create a case
- C. Problem Summary field
- i. Add your initials
- ii. Add the folder name/number
- iii. Put ‘Publish’
- D. Problem Type
- i. General Question
- E. Product
- i. Pweb_Website
- F. Provider Group
- i. Web Solutions Customer Care or Web Solutions Customer Care 160
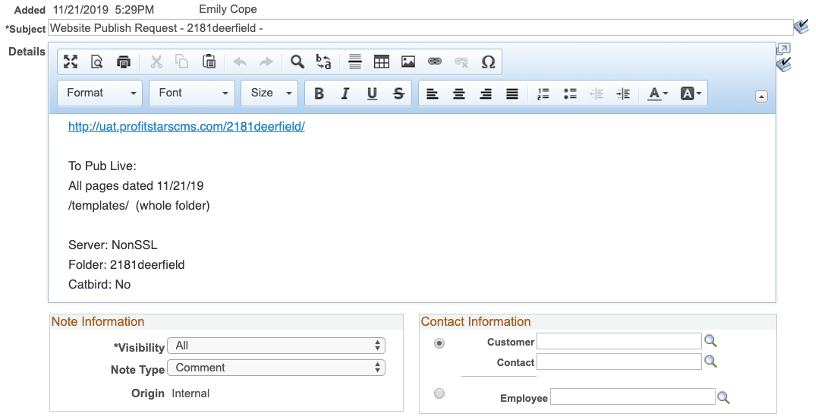
- G. Add note on Notes tab
- i. Add the UAT URL for the bank
- ii. Add all pages/files that needs to be published live
- iii. Add Server, Folder and Catbird info
- iv. Visibility: All
- v. Note Type: Comment
- vi. Example:
- vii. Hit Save at the TOP of the page
- viii. Add yourself as an interested party on the Interested Party tab
- ix. Add Transfer note to dev
- a. Note type should be Transfer
- x. Change status to Open-Transfer on the Case tab
- xi. Change provider group to Web Solutions Customer Care Developers
- a. Assigned to Walter Ponath
- xii. Hit Save at the TOP of the page
8. SENDING TO PWEB OPS
- A. New SSL Setup/Order
- i. Reference the All Things SSL doc here.
9. SENDING TO JHA DNS
- A. If the name servers end in .jackhenry.com you will send cases to IS Operations for any DNS Updates that are needed for that domain
- B. Create a support case (or use the case the client opened)
- i. See section 1 on how to create a case
- C. Add note to OPS with DNS Request
- i. List the Domain name this request is for in the note and all DNS details for the request
- ii. Example:

- D. Add yourself as an Interested Party
- E. Hit Save at the top of the page
- F. Add a Transfer note
- i. Note type should be Transfer
- G. Change status to Open-Transfer on the Case tab
- H. Change Provider Group to IS Operations
- i. Leave unassigned
- I. Hit Save at the top of the page
- J. Example:
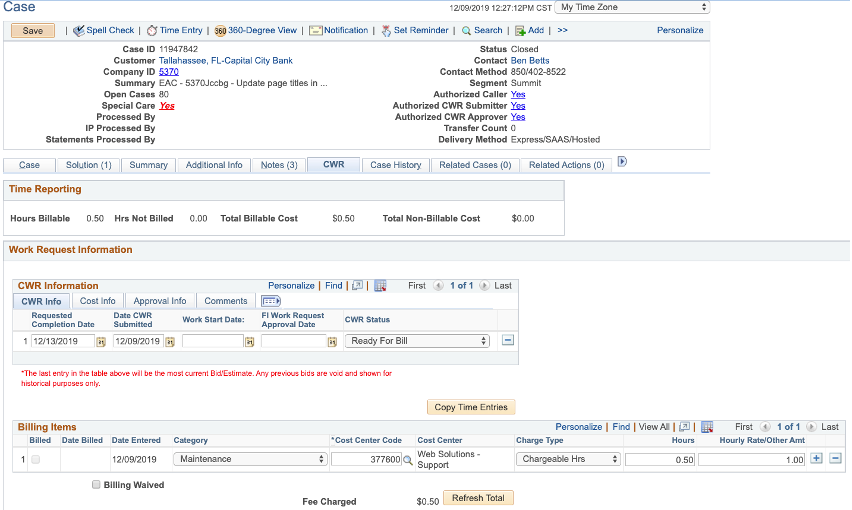
10. HOW TO BILL A CWR FOR PWEB
- A. For most cases, time billing for PWEB begins in the Time Entry Tab. All billing is in 15 minute increments. 15 minutes = 0.25 in time. Make sure that the case is saved in the correct provider group before you add the Time Entry. You can add multiple time entries on a case, but I recommend waiting until the work is complete before you move the Time Entries to the CWR tab. You can have a flat fee line (see below) on the CWR tab along with the regular Time Entry billing.
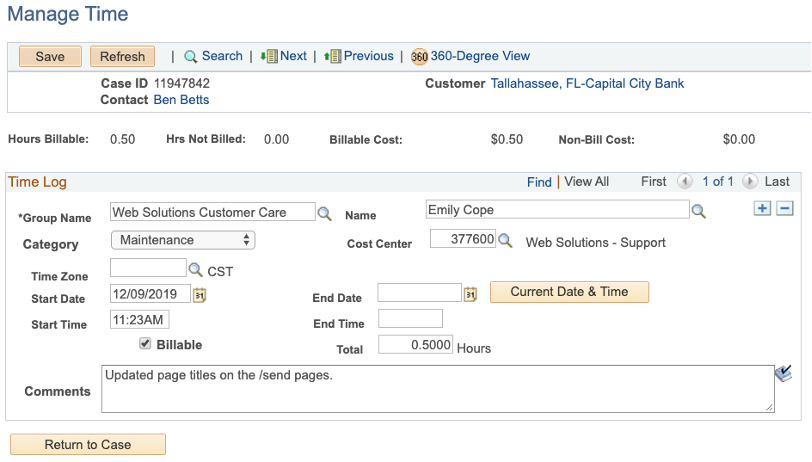
- B. If billing at their hourly rate for maintenance or billable time, click on the Time Entry at the top of the screen.
- C. The provider group should display in the ‘Group Name’ by default.
- D. If the case is currently assigned to you, your name should appear in the Name field by default.
- E. Choose the appropriate Category
- i. Maintenance: This will get billed using their built-in monthly hours.
- ii. Technical: Use this if the request is billed at the hourly rate (and no built-in monthly hours/maintenance time)
- F. Cost Center: 377600
- G. Click the checkbox next to Billable
- H. Enter the time in the Total field
- i. 0.50 = 30 minutes
- I. Add brief description of the work order in the Comments tab
- J. Hit Save at the TOP of the page
- K. Example:
- L. Hit Return to Case at the bottom of the page
- M. Click on the CWR tab
- N. Put ‘todays’ date for the Date CWR Submitted
- O. Put ‘Ready for Bill’ in the CWR Status
- P. Click ‘Copy Time Entries’ button
- i. Click OK on the popup.
- Q. Verify the time entry looks the same as what you entered
- i. If a 2nd ‘blank’ entry line shows up, click the minus sign to remove it.
- R. Click Save at the TOP of the page
- S. Example:
- T. If billing a flat fee (ex. After Hours Fee), go directly to the CWR Tab
- i. Add Date CWR Submitted
- ii. Change CWR Status to Ready for Bill
- iii. Under Billing Items, Select ‘Other’ in the Category drop down
- iv. Cost Center Code: 377600
- v. Charge Type: Flat Fee
- vi. Hours: left blank
- vii. Hourly Rate/Other Amt: Put after hours amount ($250 or $350 typically)
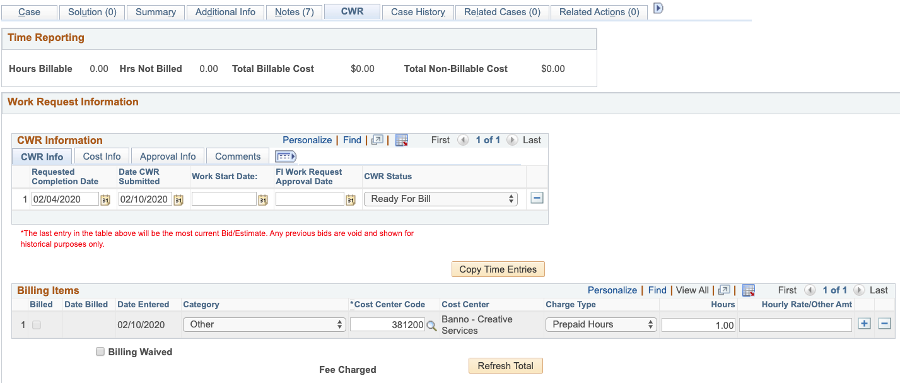
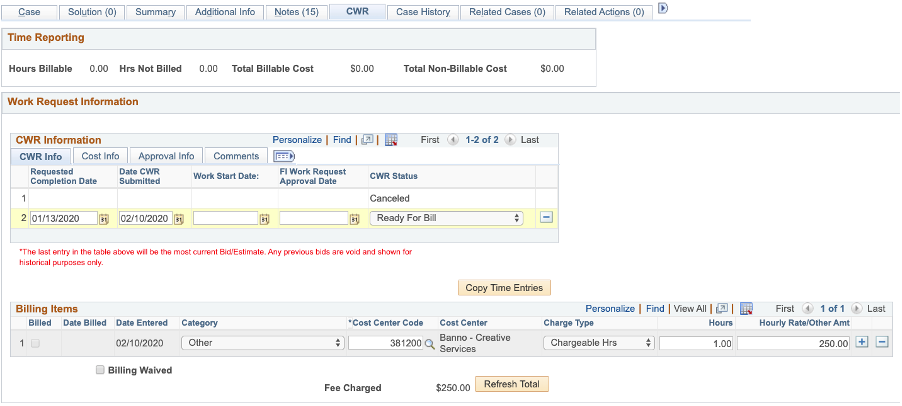
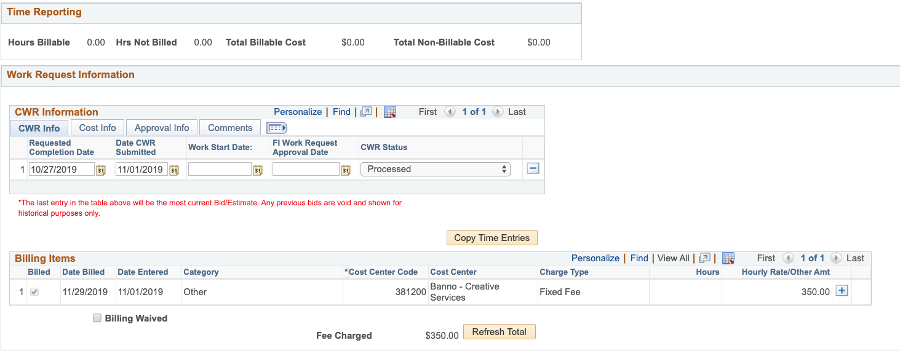
11. HOW TO BILL A CWR FOR BANNO
- A. All Billing for Banno is done in the CWR Tab
- B. You will be putting in time as ‘prepaid hours’ (for D&D time used), ‘chargeable hours’ (billed at hourly rate), or ‘flat fee’ (for rush, after hours, or flat fees for new items or SSL Renewal).
- C. On CWR Tab:
- i. Add Date CWR Submitted
- ii. Change CWR Status to Ready for Bill
- iii. Under Billing Items, Select ‘Other’ in the Category drop down
- iv. Cost Center Code: 381200 (Banno – Creative Services)
- v. Charge Type: Prepaid Hours, Chargeable Hours or Flat Fee
- vi. Hours: Enter Hour amount if Prepaid or Chargeable Hours
- vii. Hourly Rate/Other Amt: $250 (unless old Banno client with $125/hour rate still)
- D. Hit Save at the Top of the page
- E. Examples: